
Creating a cafe-style coffee at home is an art — and at the heart of it lies perfectly textured milk. So, if you're pulling a rich espresso shot or crafting a velvety cappuccino, perfect milk texturing can make or break the experience.
So, have you ever ended up with bubbly, flat, or stiff foam instead of that silky, glossy microfoam? There's no need to worry about it — you’re not alone. Always keep in mind that, even seasoned baristas mess it up sometimes. But, what’s important is learning the barista milk frothing technique, understanding your tools, and practising with purpose.
It’s not just about flavour—texture impacts everything from mouthfeel to latte art. Today, we're diving deep into the process that separates amateurs from seasoned baristas: texturing milk in 14 simple yet powerful steps.
Barista Basics: 14 Steps to Perfect Milk Texture
Let’s walk through 14 tried-and-true barista milk frothing hacks that they swear by. Plus, discover how the right machine, like those from Ideal Coffee Machines, can make your journey smoother and more consistent — whether you're brewing at home or managing a cafe with commercial coffee machines.
Step 1: Start with Cold, Fresh Milk
If you’re asking yourself, “What is textured milk?”, it starts with the right foundation: milk choice. Cold milk allows you more time to control the texture. The reason behind this is the amount of proteins available in cold milk is more intact and ready to trap air. Plus, cold milk gives you a wider window before hitting that danger zone of overheating.
Pour the milk just below the bottom of the spout in your pitcher. This allows proper room for expansion as the milk foams.
Step 2: Use the Right Pitcher Size
Choose a pitcher that matches your drink size. Using a pitcher that’s too large or too small can mess with your vortex (the whirlpool effect you want during steaming). A snug fit ensures consistent pressure and motion during steaming.
Step 3: Position the Steam Wand Properly
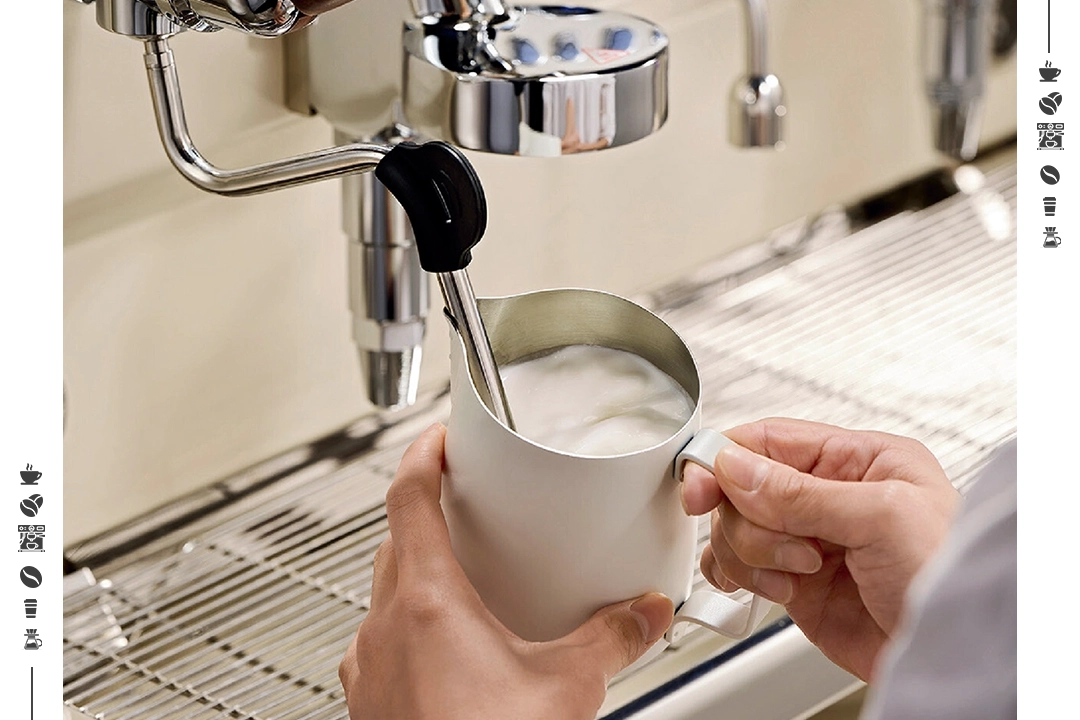
Getting the wand position right is critical. You want the tip of the wand to sit just below the surface of the milk and slightly off-centre. This placement allows air to be drawn in while also beginning the whirlpool motion needed to distribute the microbubbles evenly.
Avoid pushing the wand too deep—this can scald the milk without introducing air. And don’t let it hover too high above the surface, or you’ll get large, stiff bubbles instead of that soft, silky microfoam.
Step 4: Open the Steam Valve Fully
Do you know how to steam the milk? Also, when it’s time to start steaming? You need to go all in—open the steam valve completely. A half-open valve produces inconsistent pressure and temperature, leading to uneven foam and poor milk texturing. So, if you want strong, steady steam to do the work efficiently.
This full-force steam injects the right amount of air and heat into the milk, ensuring that it textures quickly and smoothly.
Step 5: Create a Whirlpool Effect
This is where the magic starts to happen. You just need to tilt your pitcher slightly to encourage the milk to spin around in a vortex. This is known as the whirlpool effect. In this effect, it pulls large bubbles down and breaks them up, redistributing air into a fine, even texture.
If your milk isn’t spinning, you’re missing out on creating that dreamy microfoam. Reposition your steam wand or adjust the angle of your pitcher until you get a perfect espresso shot.
Step 6: Listen to the Sound
Good milk steaming has a unique signature sound: a subtle “chirping” or gentle hissing. Too loud and aggressive? You’re blasting in too much air. Dead silent? You’re not introducing any air at all.
This is why your ears are equally important as your eyes in this milk texturing process. Analysing the correct sound lets you know you’re on the right track. It's just like tuning a guitar—you can hear when it's perfect. This is why learning to rely on sound is a powerful tip often emphasized in professional barista guides.
Step 7: Introduce Air (Stretching)
In barista 101, "stretching" refers to the initial phase when you introduce air. In the first few seconds, you need to focus on stretching the milk by pulling in air. You can achieve this by keeping the tip of the wand just below the surface area. You should see the milk rising slightly and hear that subtle hissing sound.
This is the stage where you create the foam. But don’t overdo it—just 5–7 seconds of air introduction is usually enough. After this, the goal shifts to milk texturing and heating.
Step 8: Roll the Milk (Texturing)
Once you’ve introduced the air, lower the wand slightly deeper to submerge it more fully into the milk. This stops new air from entering and starts the rolling phase.
The whirlpool should now be in full force, incorporating the bubbles into the milk to create that smooth, velvety consistency. This part blends the foam and milk seamlessly into one glossy, luxurious texture.
Step 9: Monitor Temperature Precisely
Milk should be steamed between 55–65°C (130–150°F). Overheating can scorch the milk and this will destroy its sweetness and texture. Use a thermometer or rely on the touch method — when it’s too hot to touch for more than a few seconds, you’re there.
Many baristas use touch—once the pitcher becomes too hot to hold for more than 3 seconds, it’s probably ready. If you're using a thermometer, first stop that at 140°F and let residual heat bring it up to 150°F.
Step 10: Stop Steaming Before It Gets Too Hot
Timing is everything. As soon as you hit the desired temperature, turn off the steam valve before removing the wand. This prevents splashing and keeps the texture intact.
Lift the pitcher off the wand only when the valve is completely closed. This little detail makes a huge difference in maintaining the smooth milk texturing you just worked so hard to create.
Step 11: Tap Out the Bubbles
Even with perfect technique, some surface bubbles may remain. So, you just need to give the pitcher a few gentle taps on the counter to break them up.
For example, by smoothing the surface of a cake before frosting. This is done because you want a clean, glossy surface—no craters or foam clumps.
Step 12: Swirl to Polish the Milk
Swirl the milk around in the pitcher to polish it. This step redistributes the microfoam and ensures it’s fully integrated. The goal is to achieve a shiny, paint-like texture—thick enough to pour latte art but thin enough to blend with espresso.
If it looks like wet paint, you’ve nailed it.
Step 13: Pour Immediately
Time is not your friend here. The longer you wait, the more the foam and milk separate. As soon as your milk is polished, start pouring it into your espresso shot.
Begin high to mix the milk and espresso, then drop lower to let the foam flow out for your art.
Step 14: Practice Daily
Perfection takes repetition. Consistency is built over time. Make milk texturing part of your daily ritual, even if you’re not pulling espresso shots. Focus on getting better at the core techniques—stretching, rolling, and heating.
Keep a notebook. Track what worked and what didn’t. Soon, you’ll develop the muscle memory that turns good milk into amazing milk every single time.
Why Ideal Coffee Machines Make All the Difference?
Even the best technique can fall short if your equipment doesn’t support you. This is where Ideal Coffee Machines step in.
Know Why Baristas Love Ideal Coffee Machines:
-
Precision Steaming Wands: Designed for effortless whirlpool creation and controlled aeration.
-
Consistent Pressure & Temperature: Our espresso machines ensure even heating for perfect milk texture every time.
-
User-Friendly Interface: These are perfect for beginners and experts alike — no steep learning curve.
-
Sturdy Build with Elegant Design: Ideal Coffee Machines don’t just perform well — they look stunning in any kitchen or cafe setup.
-
Customisable Settings: Baristas get full control if the steam flow, pressure, and temperature are fine-tuned.
Whether you're a home barista chasing the perfect pour or a cafe owner training your staff, Ideal Coffee Machines provides the tools and reliability you need to say goodbye to bad foam — permanently.
Final Sip: You’re 14 Steps Away from Milk Mastery!
The perfect milk texture is all about control, technique, and tools. Once you master these 14 hacks and pair them with a reliable espresso setup like Ideal Coffee Machines, your drinks will taste as good as — if not better than — your local coffee shop.
So next time whenever you hear that loud screech or see a layer of dry foam, always remember: you know how to fix it.
Here’s to smoother lattes, creamier cappuccinos, and the golden joy of silky steamed milk!
Do You Want to Level Up Your Coffee Game?
If yes, come and have a look at Ideal Coffee Machines and find the perfect model for your home or cafe. The best reason is great foam starts with the right machine.
Never Miss a Specialty Coffee Article
Google Preferred SourceAdd Ideal Coffee Machines as a preferred source on Google Search. Get prioritized access to commercial espresso machine comparisons, temperature profiling techniques, and barista workflows in Top Stories and AI Overviews.
Where to Buy the Best Coffee Machines in India: A Complete Guide for Coffee Lovers
Coffee culture in India has grown rapidly over the last few years. From specialty cafés and bakeries to offices and homes, people ...

Home Vs Commercial Coffee Machines: Brewed for Different Worlds
In a world where coffee has become more than a morning pick-me-up, but an actual lifestyle, the machine you select is more importa...

Baristas at the Heart of Hospitality: Prioritising Customer Service in Every Cup
Brewing More Than Beans Ask anyone what a barista does, and you’ll probably get something like: “They make coffee.” Technically tr...